Last updated on February 4th, 2026
It is always essential to keep a track of the money coming in and going out of the business. And with QuickBooks tracking cash flow is very much possible. Performing the right set of steps in QuickBooks can help you to find out that the money coming into your business is getting allocated properly to the employees, suppliers, and other expenses. Knowing what the future holds, makes it easy to plan the investments and take advantage of promising opportunities. It also shows you the estimates of incoming revenue for a certain period. It would surely help you in calculating the expected cash flow. Considering the need to tracking cash flow, we have drafted this segment, where we will be talking about the complete process to track cash flow in QuickBooks desktop.
Thus, give a thorough reading to this informational write-up and unleash the step-by-step process of tracking cash flow in QuickBooks. But if in case you need any sort of technical assistance at any point of time, you can directly connect with our accounting professionals at 1-800-761-1787. We will help you out in getting answers to all your queries.
Related article: How to Fix QuickBooks Payroll Error Code 15223?
Table of Contents
ToggleIdentify your financial position
Step 1: Ensure that the data is accurate
Discussing about the cash flow reporting, the very first thing is to ensure that the books are accurate. All the reports will use the data in QuickBooks, so you have a clean starting point.
- It is required to ensure that you have entered all the transactions into the QuickBooks.
- In case you have set up bank feeds, it is required to download the transactions and tally them to the transactions in QuickBooks.
- Reconciling the accounts in QuickBooks and ensuring that they tally the real-life bank and credit card statements is important. In case any help is required for reconciling the account, it is recommended to reach out to the accountant.
In case the Reconcile report matches the bank statement, you will be ready to start running the reports. If they do not tally, you can fix the beginning balance issues in QuickBooks desktop.
Step 2: Using the financial reports to see the progress
The profit and loss report and balance sheet report will depict how the business is doing depending upon the data in QuickBooks:
Running a profit and loss report
You can run the profit and loss report for the past 3 months for getting an understanding of the average income and expenses for each month. The steps involved here are as follows:
- The very first step is to navigate to the reports menu and then click on company and financial.
- Next choose profit and loss detail.

- Then followed by setting the date range for the past 3 months.
- You need to note that if user wants to change what appears on the report, then you need to select the customize report option and customize it based on the data required.
- Once you are done, you can print, email, or export the report to excel.
Try to check out the top sources of revenue in the income. And for expenses, pay attention to things like payroll, rent, insurance, and marketing expenses to see where the spending might be reduced.
Run a balance sheet detail report.
The balance sheet report gives a financial snapshot of the company as of the specific date. This calculates the business’s worth by subtracting all the money the company owes from everything it owns.
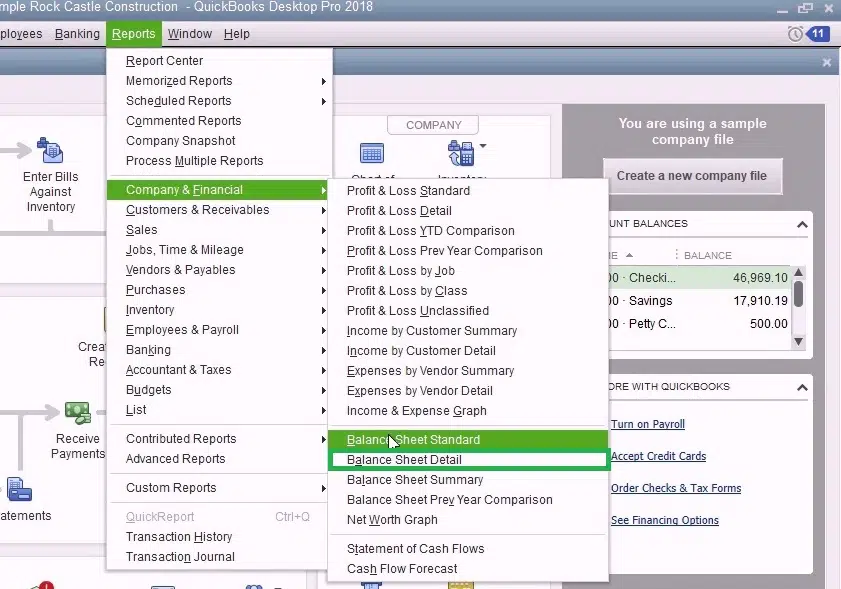
- Navigate to the reports menu and then click on company and financial.
- Followed by selecting the balance sheet detail.
- Go for Customize Report and customize it based on the data required.
- Once done, print, email, or export the report to excel.
You may also like: How to Turn On Advanced Inventory in QuickBooks Enterprise?
Process for Optimizing the cash flow in QuickBooks desktop
Step 1: For this, set up a cash flow projection
With the help of upcoming bills and cash on hand, you need to see the way the cash flow looks for the next six weeks by creating a cash flow projection.
Step 2: Identifying the top selling items
You can make sure of the company snapshot, to see what customers are buying the most. This would help you in focusing on the top-selling products or services. In order to run a best-selling item report, you can run the steps below:
- The initial step is to navigate to the company menu and then choose company snapshots.
- Pick the Add content option and then choose the right arrow.
- Followed by finding the best-selling items and then selecting add option.
- Double-click each product or service to see the detailed report.
- Also note that in case you wish to change what appears on the report, you need to select the customize report and customize it based on the data needed.
- Once done, you can print, email, or export the report to excel.
Step 3: Identify the customers having upcoming or overdue invoices
With the help of automated invoice payment reminders, QuickBooks desktop will have to identify the customers with upcoming or overdue invoices. After it is set up, you will get a notification that has the payment reminders ready to send. Also, you can review and approve them before they go out.
You might see also: Fixation of Error: The File You Specified Cannot be Opened
Step 4: Check out the bills you need to pay
With the help of the bill tracker in QuickBooks, it is supposed to identify the pending and unpaid bills. After that you can pay them directly in QuickBooks Desktop.
Step 5: Where to cut business spending
With the help of the company snapshot, you can see the top expenses and also check what can be done to reduce the spending. For running an expense breakdown report, you can carry out the steps below:
- The very first step is to navigate to the company menu and then choose company snapshots.
- Opt for add content and then choose the right arrow.
- Followed by finding the expense breakdown and then you need to select +Add keys.
- Double click any wedge on the expense breakdown to see a detailed report.
- It should be noted that if you want to change what appears on the report, choose customize report and then customize it based on the data needed.
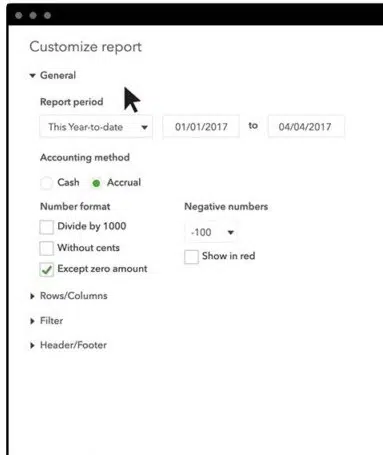
- Once you are done, print, email, or export the report to excel.
Step 6: See the top vendors for expense
In case the cash flow is causing a delay in paying the vendors, you might be able to negotiate the payment terms or delay paying bills until you have the cash. In QuickBooks desktop, run a report to see the vendors you spend the most with. You can run the report by carrying out the steps below:
- The initial step is to navigate to the company menu and then choose the company snapshots.
- Choose add content, followed by selecting the right arrow twice.
- From the top vendors by the expense and then select + Add key.
- Double-click any vendor on the expense report to see the detailed report.
- You are required to note that if you want to change what appears on the report, and then select the customize report and customize it based on the data needed.
- After the process ends, print, email, or export the report to excel.
See this also: How to Fix QuickBooks desktop freezing up problem?
Final words..!
We have tried to sum up the entire process of tracking cash flow in QuickBooks desktop. And we expect that after reading the above steps, you might be able to track the cash flow in QuickBooks. However, in case of any difficulty or if you need any further assistance, call us at 1-800-761-1787, and our QuickBooks enterprise technical support team will answer all your queries right away.
FAQs – Frequently Asked Questions
Is there a cash flow statement in QuickBooks?
QuickBooks can efficiently track accounting data and generate the cash flow statement.
How do I track petty cash in Quickbooks?
Follow the steps below:
1: Click on the drop-down menu and choose the Save account option.
2: Now, opt for Bank accounts.
3: Head to the Tax form section and click on the draw-down menu.
4: Opt for Cash on hand option.
5: Enter Petty cash in Account Name.
Other related articles:
How to Fix Error in reload.sql in QuickBooks for Windows?
