Learn how to import or export your data files in QuickBooks Desktop:
If you are in search of a process to import and export data in QuickBooks desktop, then you have landed on the right place. In order to access information, you might think the only option is starting from scratch, but the fun fact is that you can also transfer information to and from QuickBooks. This process not only makes it simpler for you to convert, upgrade, or create new company file, but also saves a lot of time that you can invest in more important tasks. The process to import and export data in QuickBooks involves a few basic steps, which we will be discussing later on in this segment. So, make sure that you stay connected to the article till the end, and do not miss out on any of the steps.
Moreover, you can also get in touch with our QuickBooks support team at 1-800-761-1787 for any further assistance. Our team can aid in your endeavor and help you in importing and exporting data in QuickBooks desktop.
You may also see: How to resolve QuickBooks Connection to Server has been Lost issue?
Table of Contents
ToggleA brief into the process to import and export data
Talking about the importing data, you can easily import things like the bank transactions, accountant’s changes, general journal entries, and batch transactions. You can also import the customers and vendors. Moreover, the same can be exported, like the available journal entries, customer and vendor lists, etc. We will look at some lists and transaction types that you can import into QuickBooks.
Lists you can import
The list of information you can import is huge. Let us have a look at the elements that you can import without any issue.
- Charts of accounts
- Vendor types
- Employees
- Items
- Shipping methods
- To dos
- Notes
- Sales tax codes
- Customers and customer: jobs
- Other names
- Classes
- Payment terms
- Customer messages
- Sales reports
- Vendors
- Budgets
- Payment methods
- Customer and job types
- Price levels
Transactions that can be imported
Now talking about the transactions that can be imported, we have listed them below, have a look:
- Account beginning balances
- Cash sales to customers
- Checks
- Deposits
- Invoices
- Account transfers of funds
- Vendor bills
- Estimates
- Payments from customers
- Vendor bills refunds
- Purchase orders
- General journal entries
- Credit memos to customers
- Credit card refunds to customers
Points to remember
There are certain points that you should remember, at the time of exporting and importing data in QuickBooks. Let us check out some of the most important ones:
- As you are not allowed to undo info imported, you should make a backup of your data files for safety purposes.
- You should also speak to the accountant before importing the data.
- Another important thing is to check out the Intuit marketplace to look for the apps that can assist you in importing the data.
You may also see: How to Reconcile Payroll Liabilities in QuickBooks?
Process to import and export information with QuickBooks desktop
The process might differ for the item to import and export, so we will be exploring the steps for different items one by one:
MS EXCEL
The standard import process for MS excel involves a few basic steps. QuickBooks opens up a formatted excel spreadsheet, where you can enter the information. At the time when you save and close the file, you can review results and view data in QuickBooks. To import customers, vendors, and products, the steps below can be incorporated:
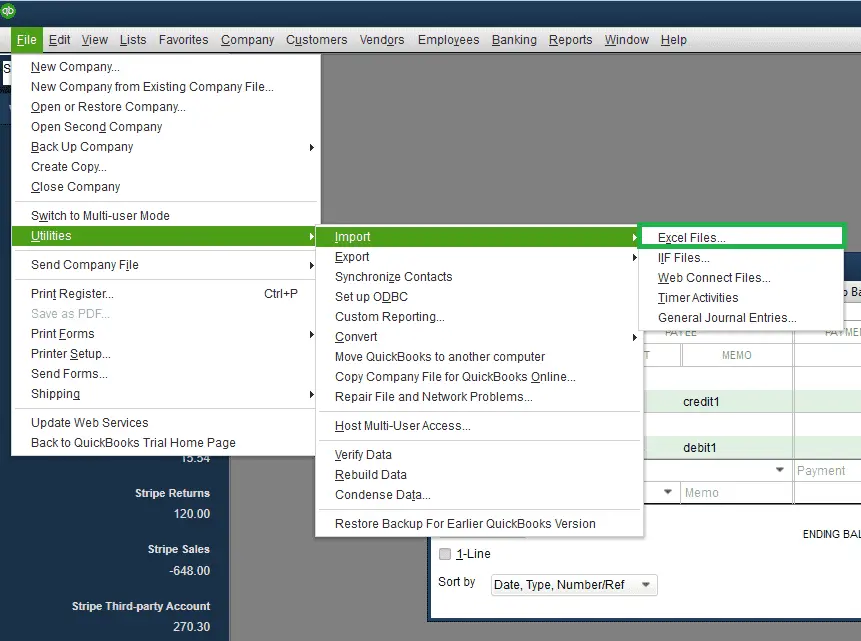
- Visit the File menu, and then select the Utilities option and then hit Import.
- Also, hit a click on the Excel files.

- If you get Add or edit multiple list entries window, then you are supposed to hit a click on No.
- Follow the wizard for importing the files:
- For this choose the Type of data.
- QuickBooks opens a formatted excel Spreadsheet. After you have entered the information, saved the file and closed it, you will be given the option to Add My Data Now.
- And then review results and View data in QuickBooks.
- End it by selecting the Close option when done.
The point to be noted here is that if you need to import additional customer, vendor or item data from excel using this option, getting back to this window option is always available.
Using CSV files
In order to import a list in the CSV format, you need to install the QuickBooks import excel and CSV toolkit. The tool kit will have the following components:
- Import from Excel and CSV Manual – A pdf document with instructions, best practices and notes.
- XLS example folder – A sample excel file containing 4 worksheets, one for each type of list.
- Allowed fields – a reference guide explain what fields are available for the excel and CSV import.
- CSV examples folder – sample CSV files, one for each type of list.
For exporting the CSV files, if you are not having MS excel installed on the system or if MS excel is not installed on the system or if yo wishes to view and edit the data using a different format.
Customer and vendors
- The first step is to open the Customer/vendor center.
- After that select Excel drop down, then you can choose the following:
- Export customer/vendor list: if you wish to export the customer data such as name, balance, or the contact information
- And Export transactions: If you wish to export transactions.
- Now, in the export window, you are required to select the Create a comma separated values file.
- And then click on the Export option.

- Now assign a File name, and then select the Location where you wish to save the file.
- Also, locate, open, and Edit the file if needed.
Reports
- For this, you need to open the Report option.
- Go for the Excel drop-down at the top of the report.
- Choose the Create new worksheet.

- Also, opt for Create a comma separated values file on the send report to Excel window.

- Next step is to select Export.
- Then, assign the file name, and also select the Location to save the file.
- And also locate, open, edit the file as per the requirements.
Read Also: How to Crack QuickBooks Admin Password?
Import and export IIF’s
The steps to export IIFs are as follows:
- The initial step is to Sign in the company file as an admin.
- And then move to the File menu.
- After that opt for the Switch to single user mode option.
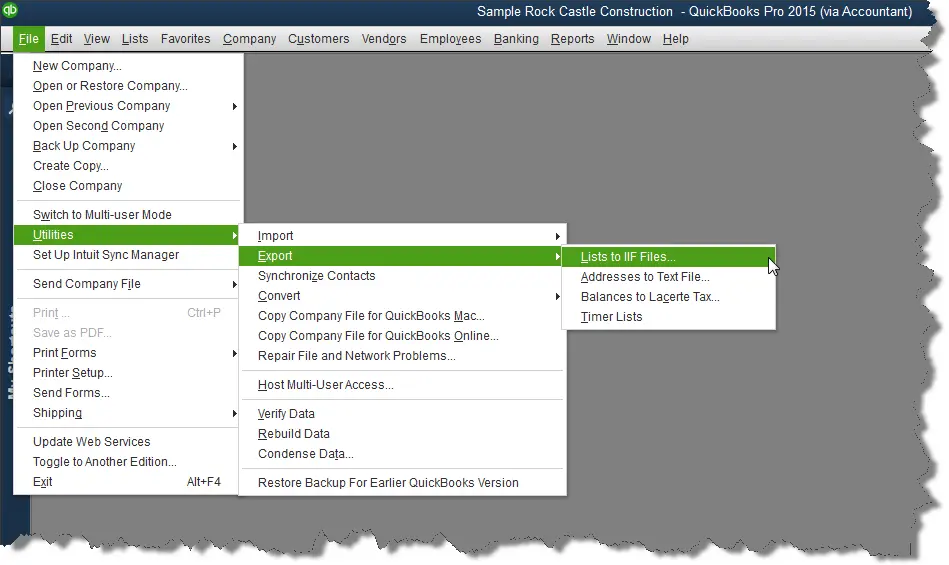
- Next step is to visit the File menu and select the Utilities tab.
- Also, select the Export IIF files.

- Next, you need to opt for the Location to save the IIF from the save in drop down.
- After that, Enter a name in the file menu and also select Save.
- The final step is to select OK button.
The steps to import IIFs
- The initial step is to Sign in the company file as an admin.
- After that, move to File and opt for the Switch to single user mode.
- Make a backup of the company file. You can restore it if the data doesn’t import the way it was expected to.
- After that, move to File menu and opt for the Utilities and Import option. Also, select the Import IIF files.

- You then need to browse the IIF file, select it and then Open it.
- The last step is to select Ok to confirm the data imported.
Importing batch transactions from the accountant

The process to import batch transactions from the accountant involves the following steps:
- Firstly, select the Batch enter transactions from the Accountant menu.
- And then, from the transaction type drop down, select the transactions, you need to enter. You will have the option to enter multiple checks, deposits, credit card charges or credits, invoices, credit memos, bills and bill credits, but only in the supported versions of QuickBooks.
- Next step is to opt for the appropriate bank / credit card or AR/AP account from the down arrow. You can also select the Add new to set up the account.
- Moving ahead, open the Spreadsheet containing the transactions to paste it to QuickBooks.
- Then, Arrange the columns in the spreadsheet to match the column order in the QuickBooks batch enter transactions screen.
- After that, highlight the Transactional information, then right-click it and also select the Copy option.
- Followed by right clicking the First date field in the list and select Paste in the Batch enter transactions screen.
- Now the information from the spreadsheet will display the Batch enter transactions screen.
- And then continue with the steps to Add all transactions.
- Next step is to select Save transactions option and also hit Yes to save.
- Finally, select OK to finish the importing process.
It should be noted that the batch transactions cannot be exported, but you can copy multiple transactions from the company file to another in a form that can be imported using the enter batch transactions feature.
Conclusion!
The list of steps for importing and exporting different data in QuickBooks desktop doesn’t end over here. You can give us a call at our dedicated support helpline i.e. 1-800-761-1787, if any of your queries remain unanswered. You can also contact us, if you want our experts and certified accounting professionals to carry out the export and import process in QuickBooks desktop on your behalf. Our 24/7 QuickBooks enterprise support team will be happy to help you.
FAQ’s
What types of data can I import and export in QuickBooks desktop?
Different data types that can be imported and exported in QuickBooks desktop include customer, vendor, and employee lists, invoices, bank and credit card transactions, purchases, and ancillary data types.
Can I import and export data between different versions of QuickBooks Desktop?
Yes! You can import and export data across different QuickBooks versions. However, the data should be compatible with both versions.
Is it possible to import data from other accounting software into QuickBooks Desktop?
Yes! Users can import data from other accounting programs into QuickBooks desktop. This is possible by using the import tool offered by Intuit or some third-party tools.
Can I export and import data between QuickBooks Desktop and QuickBooks Online?
Yes! You can easily export and import data between QuickBooks desktop and QuickBooks Online. For this, you may use the built-in export and import tools or third-party tools that facilitate the data conversion process.
More Resources
How to Fix QuickBooks Balance Sheet Out of Balance Error?
Resolving QuickBooks insufficient disk space or memory error


