Did you stumble upon IIF Import Error in QuickBooks Desktop? Well, this is definitely not the most common error that you might come across when working QuickBooks. Talking about IIF, it basically stands for Intuit Interchange format that are files encoded in ASCII text format also termed as CSV files. To understand it simply, IIF files are used in QuickBooks desktop for importing or exporting the transaction list across different platforms. As such, transferring the transactions becomes much easier and systemized. And further helps users with a data import summary. As creating these files from scratch involves a lot of technicalities, due to which one might bump into some sort errors when using QuickBooks.
We have curated this segment to help you with the right way to import IIF files and avoid QuickBooks desktop IIF Import errors. To understand it better, stick around this piece of writing.
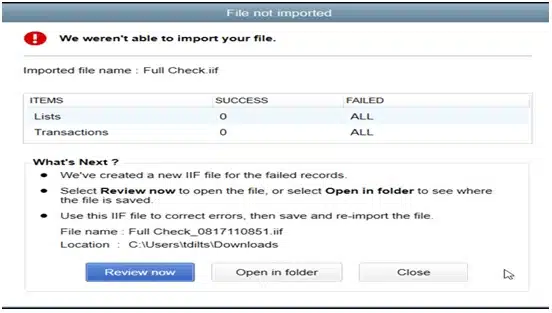
Table of Contents
ToggleA brief info about the IIF Import kit
IIF files lets QuickBooks import list data and transactions. The Intuit Interchange Format (IIF) Import kit is an easy way to import bulk data in QuickBooks Desktop. This tool allows users to import their data easily and fast. Users can download and install the IIF Import tool from the official Intuit website.
The IIF Kit constitutes the following:
- IIF Import Manual: It discusses some of the common .iif issues and methods for rectification
- IIF Example Files: It is a folder that contains some samples of .iif transactions that are determined to across versions
- IIF Header Help: The column headings are used for importing the list data in QuickBooks Desktop
You may read it also: What are the Solutions of QuickBooks Script Error?
How to download and Install the IIF Import Kit?
You can follow the below given procedure to download and install the IIF Import kit.
- Go to official website of Intuit and search for IIF Import kit.
- Select a location to download it.
- Use the Winzip extractor to extract the files of tool.
- Open IIF Import kit folder to view the files including the IIF import manual, IIF Example Files, IIF Header Help.
What types of Lists can be Imported in QuickBooks Desktop?
The following lists can be imported:
| Vendor types | Items | Import Chart of Accounts |
| Employees Classes | Sales tax codes Price level | Payment terms |
| Customers and Customer: jobs | Customer messages | Customer and job types |
| Budgets | QuickBooks Import Inventory | Import Sales Receipt |
| Import Invoices into QuickBooks | Shipping methods |
Important tips before fixing IIF import error in QuickBooks Desktop
If you are experiencing an IIF import error in QuickBooks Desktop, there are a few tips you can take to try and resolve the issue:
- Verify that the IIF file is formatted correctly
- Verify that your QuickBooks version is compatible with IIF files
- Check for special characters
- Split the IIF file into smaller files
- Consider using a third-party tool
If none of these steps resolve the issue, you may follow the below given advanced troubleshooting steps:
Read Also: How to Add a User License to your QuickBooks Software?
Steps to Fix IIF Import Error in QuickBooks Desktop
IIFs generally works for exporting and importing QuickBooks desktop data to other applications or to various other versions of the same software. You can create IIF files to transfer data like bank transactions, accountant’s changes, general journal entries, customer and vendor lists, and both transactions. To fix QuickBooks desktop IIF import errors, this process has some DIY steps:
- To start off with Sign in as admin into the company file.
- Furthermore, head to opening the File menu.
- And also choose Switch to single-user mode.
- Followed by head to the File menu and further go for Utilities.
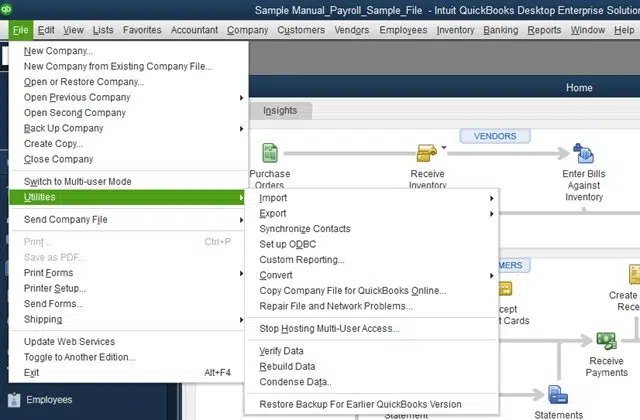
- You now have to select the Import option and then go for Import IIF files.

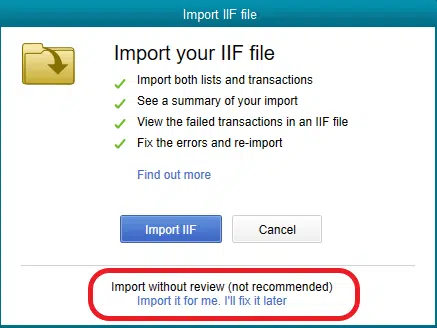
- Now, look for the Import IIF file and click on the same.
- After selecting it, click on Import it for me. I’ll fix it later option.
- The next step is to click on Open tab and also hit OK to confirm that your data was imported successfully.
Fix QuickBooks 2019 IIF File Import Error
If you come across QuickBooks 2019 IIF file Import issue, then here is how you can fix and review it. It is also termed as file not imported error.
- In case the file not imported error shows up on the screen, you first need to choose Review now.

- Head to the Issue and explore for the error core reason.
- Now fix the issue and save the file.
- You now have to close the file not imported window.
- And then, import the new fixed QuickBooks 2019 IIF.
Changing the IIF file extension to fix IIF Import Error in QuickBooks Desktop
- You need to create a copy of the IIF file and further right click on the same.
- The next step is to Rename it and change the extension to XLSX.
- Followed by double clicking on it to open it on Excel.
- Now, head to where you have faced IIF Line error in QuickBooks.
- And find out if the issue persists.
Read this also: How to Use Alternate Vendors In QuickBooks Enterprise Solutions?
Changing Extension of Journal Entries to fix IIF import issue
Usually the journal entries are imported to the company file from the previous software with a QBJ extension. You need to perform the steps below to import journal entries with modified extension, to avoid IIF import issue in QuickBooks.
- To start with, head to the File menu.
- And further, select Utilities tab.
- The next step is to choose General journal entries and also click on Import.
- The user will then have to select the .QBJ file that has been downloaded and saved on the system.
- Furthermore, click on Add GJE’s.
- And also, after the general journal entries summary window shows up, go for the OK tab.
You can further edit the failed items in the list by performing the steps below:
- You need to right click the Export file and also choose Open with.
- The next step is to choose Microsoft Office Excel.
- And then, select Yes tab, if you see incompatible features message.
- You are then required to select Save and modify Incorrect data from the file menu.
- And lastly, close excel and if it asks to save again, click on NO tab.
Fixing QuickBooks IIF Import Error using Import Tool
You can simply try out the following steps, if the error still persists:
- Choose Lists and then click on the Item list.
- Double tap the item that you want to Update.
- The item will show up where you simply need to modify the account to either dummy or another account.
- The next step is to Update an existing transaction and further click on Yes tab.
- After that, open the Item again and further modify account to the correct one.
- The last step is to click on Yes to update all the existing transaction.
Conclusion!
Heading towards the end of this segment, we believe that one might be able to successfully fix IIF Import Error in QuickBooks Desktop. Just in case you still have some queries unanswered, then all you need is to contact our QuickBooks desktop support experts team at 1-800-761-1787, and they will address all your issues immediately. We have a team of techies who understand what it takes to fix all sorts of issues in QuickBooks. Thus, feel free to reach out to us today!
FAQ’S
When you import IIF files it doesn’t link transactions?
When you import IIF files into QuickBooks, it should create new transactions or update existing ones in the correct areas of the software.
Can an IIF File be imported into QBO?
Yes, IIF (Intuit Interchange Format) files can be imported into QuickBooks Online (QBO) using a third-party conversion tool.
How do I import an IIF File into Excel?
To import an IIF (Intuit Interchange Format) file into Excel, you can follow these steps:
1. Open Microsoft Excel on your computer and click on the Data.
2. Select Get External Data from drop-down menu, then select From Text.
3. Go to the location where your IIF file is saved and select it.
4. In Import Wizard window, select Delimited as the file type and click Next.
5. Select delimiter that separates the data in your IIF file, which is usually a comma or a tab, and click Next.
6. In Data Preview window, you can review your data and make any important changes.
7. Lastly, click on Finish.
What are Common IIF Import Errors in QuickBooks?
Here are some of the most common IIF import errors in QuickBooks:
“Duplicate Name Exists”, “Invalid Account Type”, “Invalid Date”, “Transaction Amounts Are Out of Balance”, “Unable to Determine the Account Type for This Transaction”
To avoid these errors, it’s important to review and validate the IIF file before importing it into QuickBooks
Similar Topics:
How to Check QuickBooks Desktop Version and Release?
Steps to Fix QuickBooks Won’t Accept Product Number During Installation Error

