Converting an accountant’s copy to a regular company file doesn’t involve any rocket science. An accountant’s company is a sort of company file that lets your accountant to review the file and further make certain changes that are required. After your accountant has made the necessary changes, you can merge the changes without letting it overwrite the data. However, the point to be noted here is that the accountant’s copy is a .QBA or .QBX extension format file that has to be converted to a regular file to make it accessible.
And to help you in this conversion process about to convert an accountant’s copy to a regular QuickBooks company file, here we are with this piece of writing. Sharing the complete information that you need to make this conversion process, a smooth one.
Table of Contents
ToggleWhat is an Accountant’s copy in QuickBooks?
Accountant’s copy allows for a seamless collaboration of the clients to the accountants and facilitates both clients and the accountants to work on the same company file simultaneously. It also discards the necessity for emailing bulk files, thereby reducing any confusion created due to several copies. However, the accountant’s copy has .QBX extension instead of a regular company file has .QBW extension.
You might check also: How to Fix QuickBooks Error 6144, 301 and Error 6144 82?
Steps to convert an accountant’s copy to a regular QuickBooks company file
Converting an accountant’s copy involves some basic steps. Let us understand each of the steps and procedures in detail:
Step 1: To change your accountant’s copy to a company file
- You simply have to double-click the Accountant’s copy and open the same.
- Once done with that, save the data and prevent Data loss.
- Furthermore, make a backup of the file before heading forward.
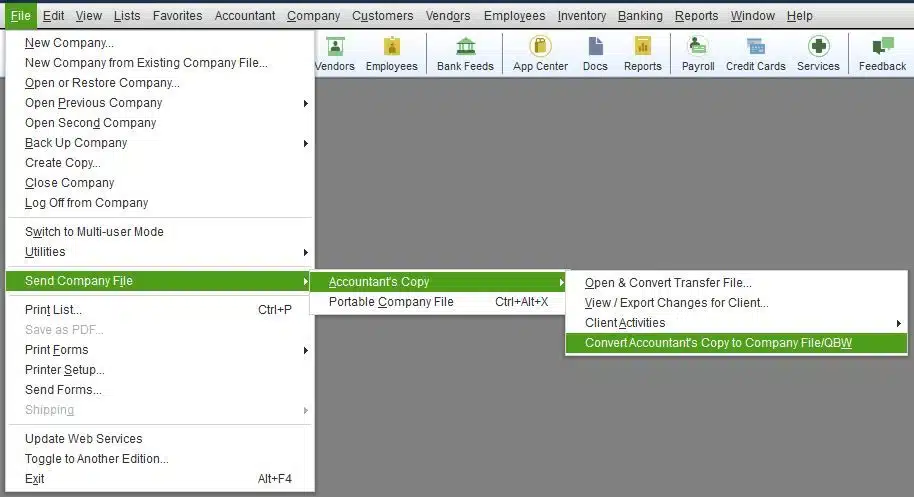
- You now have to choose Send company file from the File menu.

- The next step is to choose Accountant’s copy and further Convert accountant’s copy to company file/QBW from the dropdown menu.
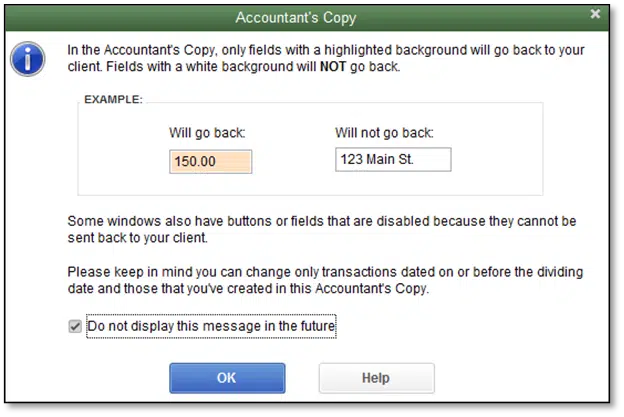
- Heading forward, you need to confirm the procedure by clicking on the OK tab.
- Followed by, selecting a location for the file to be saved.
- After that, choose a folder and further rename the file depending upon your preferences.
- The next step is to select the Save your file option.
- And also click on OK tab.
- A new file will be created and you can make necessary changes to it according to your convenience.
- While converting the accountant’s copy to a regular company file, you should make sure to enter the changes that were made to the original company file while creating the accountant’s copy.

Step 2: Change the accountant’s copy to a normal file
- Under this process, you need to choose the Accountant’s copy from the File menu.
- Furthermore, choose Convert the accountant’s copy to a company file.

- After that, a new window will open after you go for the Convertor option.
- You now have to spot and Open accountant’s copy file you want to convert.
- Followed by, clicking on ok after ensuring you have opted for the right file.
- The next step is to select a Location where you want to save the newly converted file and further Rename the chosen file.
- After that, under the save as type option, you need to choose QBW as the file extension.
- Followed by, clicking on Save.
- After the file gets converted, you will receive a notification regarding the same.
- Now, click on the OK tab.
- Moreover, you will have a QBW file that you can use normally.
Step 3: Changing the accountant’s copy as Accountant’s changes .qby
- Here you need to head to File menu.
- Followed by, selecting Open or restore company from the dropdown.
- The next step is to choose Next tab after selecting Convert an accountant’s copy transfer file.

- You now have to choose the Convert accountant’s copy transfer file option.
- And then, click on Next.
- This will give you an overview of the file you opted to ensure you made the right decision.
- Furthermore, click on Next tab.
- And also, find the Accountant’s copy file.
- After the accountant’s copy file is opened, click on Confirm and further assign a name to the file.
- Now, it is time to Save the file.
- And you can make use of the qby file after the conversion ends.
Conclusion!
Converting QuickBooks accountant’s copy to company file might seem to be quite a tedious task but in actual it isn’t. However, if you still find it a bit difficult and need any sort of technical support and guidance, then reaching out to our QuickBooks desktop support professionals at 1-800-761-1787 is what we recommend. We are a team of certified ProAdvisors who ensure that all your queries are addressed immediately and resolved in the best possible way. For any issues related to QuickBooks, call us today!
Related Posts:
How to Fix QuickBooks Error 1304 When Writing to File in Windows?


