Get to know how you can deposit customer payments into your bank account in minutes:
Are you in search of the guide to get instant deposits in QuickBooks desktop? If yes, then your search ends over here. This article contains the nitty-gritty of the process to get instant deposits in your QuickBooks. When one uses QuickBooks payments to process customer payments in QuickBooks desktop, then it can take time of a couple of days to get the money into the bank account. This is when instant deposits come into play. Instant deposits for QuickBooks desktop permit the user to get the money even faster. The user can also get instant deposits in QBO. Setting up instant deposits allow the user to get funds into the bank account in less than 30 minutes. One can also schedule instant deposits to run automatically for specific days of the week.
To know more regarding the process to get instant deposits in QuickBooks desktop, make sure to read ahead cautiously. In spite of that, you can also connect with our accounting professionals for further technical assistance via our toll-free customer support number i.e., +1-800-761-1787.
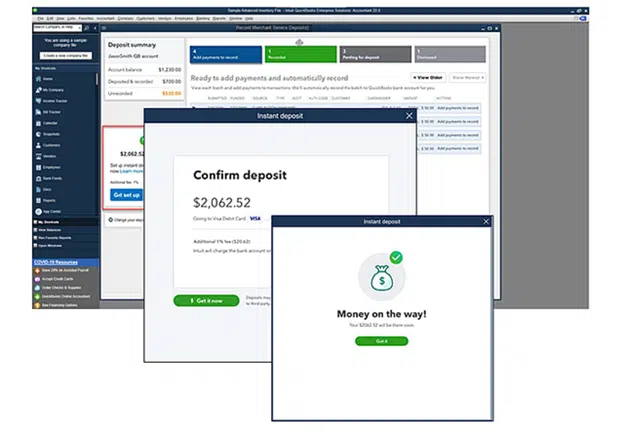
You may also like: How to Host QuickBooks Desktop Company File?
Steps to Get Instant Deposits in QuickBooks Desktop
As we mentioned earlier, there are certain steps that can be followed to get instant deposits. We have jotted down the steps below, let us have a look:
Step 1: Setting up for Instant Deposits
In case users doesn’t signed up already for QuickBooks payments, then they need to have a QuickBooks payments account to get instant deposits. QuickBooks accounting software makes use of the debit card to deposit the money into the checking account. Moreover, it should be a Visa or Mastercard connected to a checking account at the bank or credit union. The most important point to note here is that Intuit only makes use of debit card to facilitate instant deposit and also the fees will continue to be debited from the regular payments bank account.
Steps to add the debit card
The user can add the debit card by carrying out the steps below:
- The first step is to move to the Customers tab and then choose Credit card processing.
- Followed by opting for Record merchant service deposits.
- The next step is to choose the Get set up in the instant deposit banner on the home page of the Merchant service deposits window. Also note that the option will only be available if the user is eligible and the Primary admin of the company.
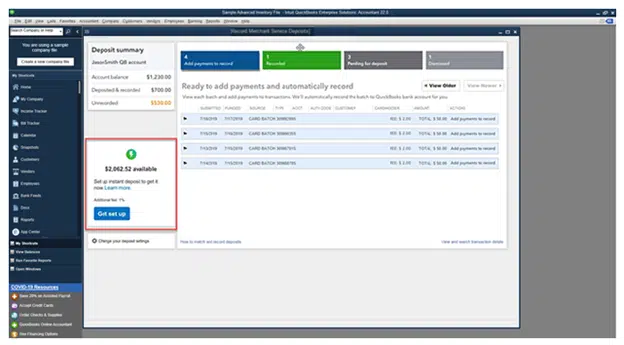
- After that, the user needs to follow the onscreen steps and also Enter the debit card information.
- After getting the confirmation code, the user will have to enter it for verifying the account.
The users will get the confirmation regarding the card being linked. The user should also get an email after the debit card is successfully added to the merchant account.
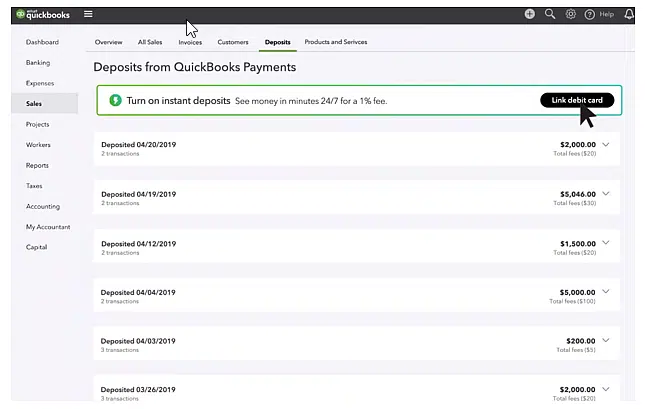
Opt for an account to record instant deposits
The user might get a prompt regarding selecting the instant deposit account, in case it isn’t set up already. This will also permit the user to automatically reconcile the account.
- The user is required to opt for the select Account when prompted. These settings can also be edited by using the Change Deposit Settings tab.
- After that, it is recommended to select the Account in the bank for instant deposits field. The user can also Add a new account, which will be added to the chart of accounts.
- The last step for this is to select Save settings tab, once done with the steps above.
Step 2: Check the available funds
Each time the customer payments are processed, they might move to the available balance, which is the money available to deposit instantly. The user can check the available balance using the steps below:
- For this, the user needs to first move to the Customers tab and then click on Credit card processing.
- After that, choose the Record merchant service deposits.
- Followed by reviewing the available balance in the instant deposit banner.
An instant deposit can be attained only if there is an available balance. The most important point to be noted is that the user can get the entire available balance, and not for a particular portion.
Read this also: What File Types and Extensions are Used by QuickBooks Desktop?
Step 3: Getting an Instant Deposit
- The first thing to do for this is to move to the Customers tab and then choose Credit card processing.
- After that, go for the Record merchant service deposits.
- And then, click on Get it fast tab in the instant deposit banner.
- The user is then required to review the Total and associated fees in the confirm deposit window.
- Followed by select Get it now, once set to initiate the instant deposit.
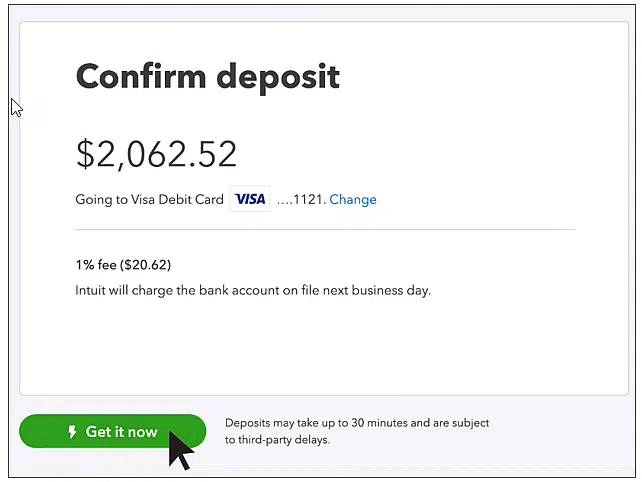
After the above steps are followed, the user will see the money in the bank account linked to the debit card. This might take around 30 minutes or so which completely depends upon the bank. The user will receive an email after the money is deposited successfully.

Guidelines to follow while requesting an instant deposit
- The user should make request before 3 PM PT for payments received before 3 PM PT, in order to get the money on the same day. At 3 PM PT, the available balance is processed at the normal speed..
- Whereas, for the payments received after 3PM PT, it is recommended to make requests anytime before 3PM PT the following day, in order to get the money deposited within 30 minutes.
The user can also request instant deposit 24 hours a day, 7 days a week.
Steps for Scheduling automatic instant deposits
The user can also schedule instant deposits for fixed days of a week. The Intuit team verify and instantly deposit the users complete available balance 3 times a day at 9 AM PT, 2 PM PT and 9 PM PT. In order to schedule automatic instant deposits, follow these steps:
- Begin with, the user should choose Deposit Settings from record merchant service deposits window.
- After that click on Change from the schedule section.
- Later head towards, the users need to choose the days they want for instant deposits.
- Once done with that, choose Save schedule.
The user can view or edit the schedule settings in this schedule section.
Steps to change the account the money deposited to
In case the user requires to change the debit card and check the account the money deposited to, the below steps can be followed:
- At first, the user is supposed to navigate to the Customers tab and then choose the Credit card processing.
- After that, choose the Record merchant service deposits.
- Followed by selecting the Change deposit settings tab.
- The next step is to select Change to edit the instant deposit information.
- And when done, choose Save settings.
It should be noted that multiple debit cards cannot be kept on a file.
Check Also: How to Amend or Correct Forms 940 and 941 in QuickBooks Desktop?
Recording instant deposits and related fees
- Initially, the user is supposed to move to the Customers tab and also click on Credit card processing option.
- The next step is to select the Record merchant service deposits tab.
- Once done with that, choose the Instant deposit account for reviewing the customer payments.
- The last step here is to choose the Deposit from the list given.
The user will be able to spot the customer payments included in the instant deposit and a breakdown of related fees. It is recommended to allow up to 24 hours for Instant deposit transactions in order to appear in Merchant service deposit window.
The steps below can be followed to see monthly statement:
- First of all, the user is supposed to Sign in to the Merchant Service Center.
- And then, choose the Activity and reports tab and also click on All statements.
- The next step is to look for the Most recent statement and hit View tab.
- After that, the user is supposed to enter the last 4 digits of the Tax ID number.
- Moreover, the user needs to View the date in the activity summary. Also, this is the date the deposit was made.
Understand Instant Deposit processing fees
It should be noted that the processing fees aren’t taken out of the available balance. While making an instant deposit, full amount is deposited and the fees is taken later on and both of them are shown as two separate transactions. The processing fees is taken from the bank account used for standard payment processing. It is not mandatory that this account should be the one in which instant payment is received, it can be a different one.
Also Read: How to Sync Outlook Contacts with QuickBooks Desktop?
In a Nutshell!
Instant deposit is basically an additional service offered by QuickBooks payments subject to the eligibility criteria. In order to qualify, the QuickBooks payments account should be active and working properly. Moreover, the payments are sent to the bank which is linked to an eligible debit card in minutes. Also, the deposit times might vary due to third-party delays.
The above stated steps are expected to be enough to get instant deposits in QuickBooks desktop. However, if you get stuck at any stage or if you feel the need of any technical assistance, then feel free to discuss your queries with our QuickBooks desktop support team. Give us a call at our customer support number i.e., 1-800-761-1787, and let our team resolve your queries instantly.
FAQ related to it
What to do if Instant deposit feature is not visible?
It should be noted that only eligible QuickBooks payments users can use instant deposits. The option can be seen in the Record merchant service deposits window.
Why an unexpected charge for an instant deposit is seen?
The instant deposit fee is 1% of the total deposit amount. And this fee is in addition to the standard fees that is charged for processing customer payments.
What should be done if available balance is different than expected?
When one processes customer payment, it might add to available balance for an instant deposit. The users might not see anything in the available balance if:
1: If they haven’t processed any customer payments for the day.
2: Or the customer payments aren’t eligible for instant deposits. Certain transactions are still deposited at standard speed, even if they are scheduled as instant deposits. Moreover, ineligible payments aren’t a part of the available balance.
3: In case the processed customer payments are under review.
4: Also, if it is after 3 PM PT, as after this time the available balance is batched and deposited at the standard speed. The user will have to wait till processing new customer payments in order to get an instant deposit.
How an instant deposit can be voided?
It should be noted that an instant deposit can’t be void once it is requested. This also includes specific customer payments that are part of instant deposit. For other refunds, the steps to process a credit card refund can be followed. And also, the same refund fees will be applied. It is important to note that instant deposit is an additional service offered by QuickBooks payments subject to the eligibility criteria. Moreover, QuickBooks payments account must be active and working properly to participate.
More helpful topics you may like:
How to Fix QuickBooks Payroll Update Error Code 15221?
Methods to Convert to QuickBooks Enterprise from Desktop Pro/Premier
Steps to Configure Firewall and Security Settings for QuickBooks Desktop


