Last updated on February 4th, 2026
Learn how to export lists from the old company file into a new data file in 4 simple steps:
Exporting lists from an old company file into a new data file can be a bit tricky if you are new to QuickBooks. This article intends to provide you with detailed information for exporting lists from old QuickBooks company file into a new data file.
Important: We expect that you have an active QuickBooks Desktop payroll Subscription and you already have created a company file.
Table of Contents
ToggleImportant points you shouldn’t avoid
Following are the pointers which you have to keep in mind before exporting lists from a old QuickBooks company file to new QuickBooks data file: So keep, read on:
- These steps will only allow you to import lists. Batch Entry is a third-party software that allows you to move your transactions.
- You can’t import names or list items into your new file, if you have custom fields enabled. Before you import the file to the new one, delete the custom field information from the .IIF file. Once you import your lists, you will need to enter the custom field information again in the new file.
- Your file will be damage or corrupt, if you try to import damaged lists into your new company file.
- Before you start importing lists or adding information to an existing file, be sure to make a backup of your company file first.
You may see also: Install multiple QuickBooks Desktop versions on one computer
How you can export lists from old company file into a new data file in QuickBooks
Follow the steps provided below in the same order to get successful results.
Step 1: Export list
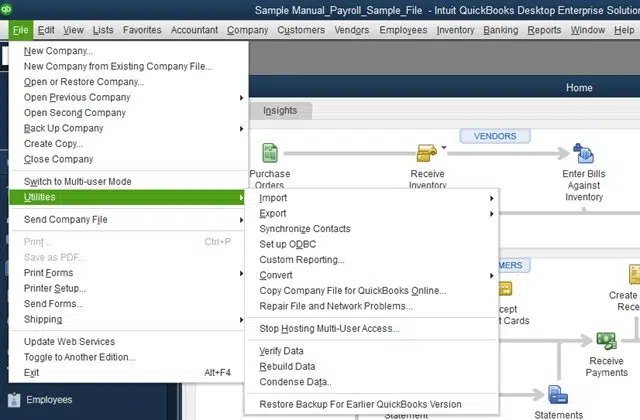
- Go to QuickBooks File menu, and select Utilities, followed by Export and Lists to IIF Files.

- Select the list that you have to export and click OK.
- Now search the location where you want to store your file and click Save.
Things you should know:
- Exporting the list from QuickBooks creates an .IIF file that can be opened on notepad or excel.
- You shouldn’t Export the major lists (Item, Customers, Vendors) simultaneously but one at a time to keep from facing any issues caused by exporting very long lists.
Step 2: Clean up your lists (Optional)
- Initially, you need to click on file and open the IIF file that you exported from your company file in Excel.
- Open MS Excel.
- After that, click on the File menu and select Open (Click on the Office Button Open if you’re using Excel 2007).
- Select the storage location where you saved the .IIF file.
- In the file type field, select All Files.
- Now select your IIF file, then click on Open.
- Click on Next two times and then Finish in the Text Import Wizard. The IIF file will next open in MS Excel sheet.
- Make the necessary edits in MS Excel.
- Click Save to save all the changes you made to the IIF.
- Go to File menu and hit a click on Save button (Click on the Office Button and then Save opt, if you’re using Excel 2007).
- Click Yes when prompted and exit Excel.
- Next, you will be once again prompted to save the IIF file.
- Click Don’t Save.
Things you should know:
What should you clean up from the list?
- Customers you no longer sell or offer services to
- Vendors you no longer do business with
- Ex-employees
- Items that you have discontinued selling
- Any other entries unnecessary in the new company file
Read also: What are the Steps to Fix QuickBooks Read Only Error?
Step 3: Import the list
- Login into QuickBooks with admin credentials in single user mode and open the new company file.
- Click on the File menu, and select Utilities.

- Select Import and click IIF Files and Import the Chart of Accounts.
- After that choose Import and hit a click on IIF Files.
- After the Chart of Accounts is successfully imported, import the other list in the following order.
- Import the lists that have no information in common with other lists such as,: Customer Type List, Vendor Type List, Class List, Job Type List, Payment Terms List, Payment Methods List, Shipping Methods List, Customer Message List, To Do Notes.
- Import the lists one by one in the given order: Vendor/Supplier, Employee, Other Names, Sales Rep, Item, Price Level, Customer, and Budgets (follow the sequence).
Points to remember:
- You can ensure a smooth import by following the instructions given above.
- It is strongly recommended that you back up your company file prior to importing any lists. This will also be true after you have successfully imported one or two major list.
Step 4: Set up the opening balance
Here is how you can set up an opening balance for a bank, credit card, and other types of accounts.
1: Set up balance for bank or credit card accounts
- Firstly, sign in to your bank’s website or find a bank statement.
- After that, open QuickBooks Desktop, go to Company menu and select Chart of Accounts.
- Right-click anywhere on your Chart of Accounts and then click New.
- In account type, select Bank or Credit Card and then click Continue.
- Give a name to your account. If you have more than one account of the same type or with the same bank, save them with unique names so they’re easy to distinguish.
- Fill out the rest of the data fields and then select Enter Opening Balance.
- Next, if you want to edit your opening balance, click the Change Opening Balance button.
2.: Asset, liability, and other types of accounts
- Sign in to your bank’s website or find a bank statement.
- Open QuickBooks Desktop, go to the Company menu and select Chart of Accounts.
- Right-click anywhere on your Chart of Accounts and then click New.
- After that select Fixed Asset, Loan, or Equity and then click on the Other Account Types drop-down and one of the types.
- Now select Continue tab.
- Give a name to your account. If you more than one account of the same type or with the same bank, save them with unique names so they’re easy to distinguish.
- Fill out the rest of the data fields and then select Enter Opening Balance.
- If you later on want to edit your opening balance, click the Change Opening Balance button. What you put in for your opening balance depends on how you want to handle your past transactions:
- If it’s not needed to enter older transactions that come before the opening balance date in QuickBooks: Enter the last balance and date from your most recent bank statement and select OK. All your past transactions are now summarized, and you can start tracking new transactions from now on.
- If you wish to enter your past transactions in detail: Select a date. You should select a date older than the oldest transaction you may want to track in QuickBooks. Your opening balance summarizes everything before the date you pick. Enter the date you chose in the Ending date field, and then in the Ending balance field, put in the balance of your real-life account for that date. At the end, select OK. This process would keep you from counting past transactions twice.
- Now select Save & Close to record the opening balance.
You might also consider: Steps to sync and share the QuickBooks files between two computers
Winding up!
We hope the above-given steps might be helpful for you in order to export lists from the old company file into a new data file. However, if you have any more queries or you need assistance with any QuickBooks-related issue, you can contact our certified QuickBooks error support experts. Reach us easily by dialing toll-free 1-800-761-1787. We will be more than happy to help you out with your accounting concerns.
FAQs
What are the benefits of exporting lists from an old company file?
Exporting lists helps users in saving their time, especially when a large quantity of data is to be transferred. Exporting lists also helps in bypassing data entry errors while making sure that the new data files are accurate.
What are the different lists that can be exported from an old company file?
The different lists that can be exported from an old company file encompass customer lists, employee lists, vendor lists, charts of accounts, inventory items, etc.
What file formats can be used for exporting lists?
While the lists can generally be exported in Excel or in the CSV format. However, other formats, too are acceptable.
Can I customize the lists before exporting them?
Yes! The lists can be customized before being exported. It implies that users have the prerogative to add, remove, or modify items.
What should I do if I encounter errors during the import process?
If users stumble upon any technical error while importing lists, they need to double-check the file format.
More Suggested Reads:
Solution to Fix QuickBooks Web Connector Error QBWC1039
Fixing QuickBooks Scheduled Backups are NOT working on Windows 10


