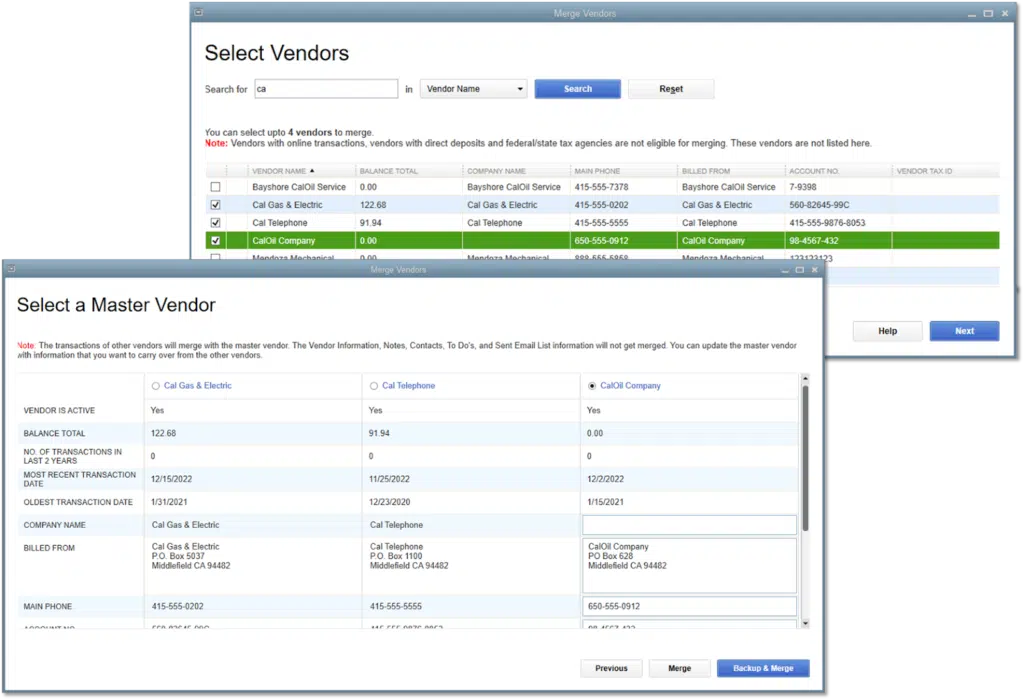
Get the DIY steps to merge accounts, customers, suppliers, and more in QuickBooks Desktop for Windows and Mac:
Want to learn the process to merge list entries in QuickBooks? Or entered the same item twice, but different names? Well, need not to worry, as today, we will be discussing the process to merge duplicate entries and keep the lists accurate. You can easily merge list entries in QuickBooks desktop by performing the steps that we have discussed later in this article. Thus, we would recommend you to read this article carefully till the end. Or else you can also contact our team professionals right away.
Important points to remember
Before the user starts with the steps, it is important to note certain points. These points include the following:
- The user needs to backup the company file in QuickBooks desktop for Windows or mac.
- And also switch the company file to ‘Single User’ mode.
- Moreover, clear any pending accountant changes.
- And ensure multicurrency isn’t turned on in QuickBooks desktop for Windows.
- Ensure that the suppliers to merge aren’t.
- Tax authorities
- Tax exempt
- Paid through online banking
- Direct deposit suppliers
You might read also: How to Fix QuickBooks Not Opening After Windows 11 Update?
Steps to Merge List Entries in QuickBooks desktop for Windows
Merge entries in chart of accounts, item list, customer list, and employee list
- At first, the user needs to move to the Lists that has the entries that are to be merged.
- After that, copy the name of the entry you wish to keep.
- Now, right click the entry you don’t want to use, and choose Edit.
- Also, paste the name you copied, choose Save and Close tab.
- The last step is to go for the Yes tab to merge the entries.
Also note that if you get a message that says “You cannot merge an account that has online information associated with it into another account”, you have an active bank feed on one of the accounts. The user can perform the steps to turn off the bank feeds.
Steps to Merge suppliers list entries tool in QuickBooks Accountant and Enterprise Editions
Steps for QuickBooks desktop for Windows 2019:
- For Accountant Edition: The very first step is to move to the Accountant menu and also select Client data review and then select Merge suppliers.
- For Enterprise edition: Move to the Company menu and select Accounting tools, and then tap on Merge suppliers.
- Followed by, select the suppliers you want to merge, and select Next tab.
- Now choose a Primary or master supplier and then select Merge.

- The last step is to select Yes to merge the suppliers and hit Ok.
Steps for QuickBooks desktop for Windows 2018 and below:
- The first step is to move to the Suppliers menu and choose Supplier center.
- After that, copy the name of the supplier you want to keep.
- Also, right click the Supplier you don’t wish to use and choose Edit supplier.
- Later on, paste the name you copied and also hit Ok tab.
- Lastly, choose Yes tab to merge the suppliers.
Also Read: How to Fix Windows Updates Not Installed Warning in QuickBooks?
Steps to Merge List Entries in QuickBooks Desktop for Mac
Merge entries in chart of accounts, item, customer: Job, supplier, employee, and other name.
Step 1: Re-name to merge:
- Move to the Lists that has the entries you wish to merge.
- And also, copy the name of the entry you wish to keep.
- In the next step, choose the entry you don’t want to use and then select the Pencil icon to edit it.
- And also, paste the name you copied and also hit OK.
- End the process by selecting Yes to merge the entries.
Step 2: Use the Merge menu item:
- Begin with, move to the Lists first and select the list that has the entries you wish to merge.
- And them choose the name of the entry you wish to remove.
- Moving ahead, move to Edit menu and choose Merge option.
The point should be noted here that you can directly select the Merge option by hitting a right-click on the entry.
- Furthermore, choose the name of the entry you wish to keep.
- Now choose Merge option to merge the entries.
- End the process by selecting Yes to confirm the merge operation.
Conclusive Words!
With this we come to the end of this article, where we hope that the information discussed in above might help in merging entries in QuickBooks desktop. However, if the user isn’t able to perform the necessary steps for some reason, then in that case we would suggest to consult our QuickBooks desktop support team at 1-800-761-1787, and let them carry out the required steps. This will not only ease the process but ensure no further hassle.
Other helpful topics:
Steps to Fix QuickBooks Error OLSU-1024 or OLSU-1022 when creating an account for Bank Feeds
How to Troubleshoot Multi-user Issues for QuickBooks for MAC?


