Get the easiest ways to setup your folder permissions in QuickBooks Desktop:
Accessing folders in multi-user mode, right Windows permissions are a must. Each QuickBooks version has corresponding components that require an update to work when in multi-user mode. The user might face multi-user errors, which might be pretty much time consuming to fix. One can fix the company file and network issues with QuickBooks file doctor. It will analyze the basic issues with multi user mode. If you are looking for the process to set up folder and windows access permissions to share company files, then reading this post carefully will help in the process. However, if you need any sort of technical assistance, then give us a call at our tollfree customer support number, and speak to our technical support team immediately.
Important points
There are certain important pointers that one can’t afford to miss. These pointers include:
- The user needs to ensure the installation directories have the correct permissions.
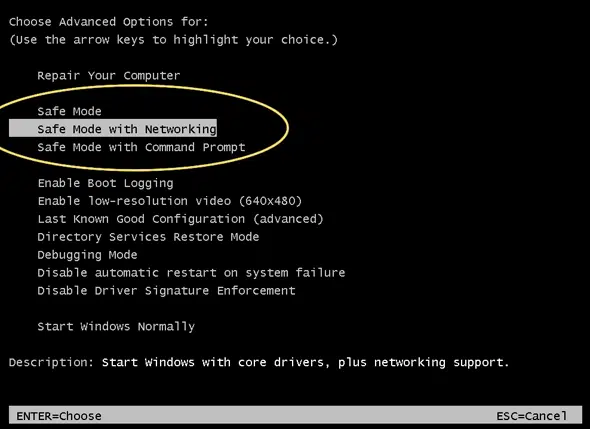
- Also, in case the user is running Microsoft Windows edition, then the Security tab might not be available in Normal mode. The user will have to restart the system in safe mode to complete the steps.
- The user will have to restart the system and press F8 key until the Advanced boot window opens.
- Also, on the Advanced boot window, the user needs to select Safe mode and then hit Enter tab.
- Moreover, workstations multi-user access enabled can inadvertently go into Alternate hosting mode and also take the ownership of a company file. As a result of this, other users won’t be able to open the file.
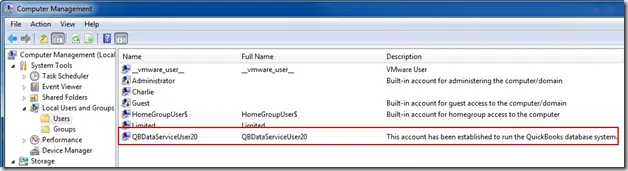
- The QBDataServiceUserXX depends on the version of QuickBooks desktop being used.
You may read also: What is QuickBooks PDF Converter and How to Use it?
Steps to Set up Folder Permissions in QuickBooks desktop
The user will have to verify that the permissions are set correctly:
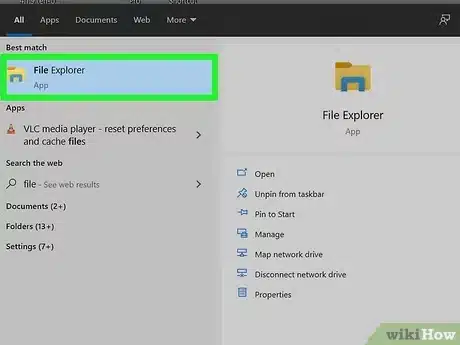
- The user will have to open the Windows start menu and then open the File explorer.
- After that, right click the folder having the company file, and along with that choose Properties tab.
- The next step is to select Advanced on the Security tab.
- Followed by selecting the QBDataServiceUserXX and also click on Edit tab.
- Once done with that, the user is supposed to set the following settings to allowed:
- Traverse folder/Execute file
- List folder/read data
- Read attributes
- Read Extended attributes
- Create files/ write data
- Create folders/ append data
- Write attributes
- Write extended attributes
- Read permissions
- If the permissions are not set properly, the user will have to follow the below steps:
- The very first step is to right click the folder having the company file and also select Properties.
- After that select Security tab and Edit tabs.
- Now, opt for QBDataServiceUserXX and then choose Full control and also allow tabs.
- The last step is to select Apply and OK tabs respectively.
Steps for Sharing an existing folder
- Under this, the very first step is to locate the folder you want to share and hit a right-click on it.
- After that click on Properties.
- Now on the Sharing tab, you need to choose the opt to Share this folder.
- In the Share name field, you can alter the name of the shared folder by simply entering a new name.
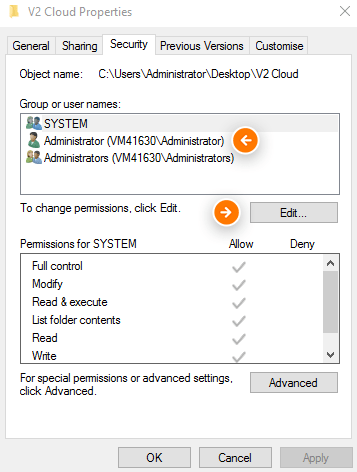
- Once done with that, navigate to Security tab.
- And then select the Permissions option in order to set permissions for every user.
- To save process tap on Apply button. Now click on OK to close the window.
How to Create a new shared folder?
You can follow these quick steps to create a new shared folder using Create a Shared Folder Wizard.
- Initially, it is required to press the Windows + R keys together on your keyboard to open Run window.
- After that type “shrpubw.exe” command in that, and press OK button.
- Now you need to follow all the set of steps on the wizard to share your folder.
Stop sharing a folder
- At first, you need to point out the folder that you want to stop sharing.
- Once located, follow any of the step:
- Hit a right-click on the folder first, and then select Give access to option, then tap on Remove Access.
- Also, you can select the folder, then select Share tab at the top of File Explorer. Now from the Share with section, choose Remove access opt.
- Lastly, close the File Explorer.
Check Also: How to Upload Or Download a QuickBooks Desktop Company File to Intuit?
Configuring the folder permissions in QuickBooks
In case you want to adjust the folder permissions, then you can follow the steps below:
- First of all, the user will have to open the Windows start menu and then open the file explorer.
- After that, look for and right click the folder listed below:
- C:\Program Data\Intuit\Entitlement Client\v8
- C:\Program Data\Intuit\Entitlement Client\v6.0
- C:\Program Data\Intuit\Entitlement Client\v5
- C:\Program Data\Intuit\Entitlement Client\v3
- C:\Program Data\Intuit\Entitlement Client
- C:\Program Data\Intuit\QuickBooks Enterprise Solutions X.0 (X = version) or C:\Program Data\Intuit\QuickBooks 20XX (XX = year)
- C:\Program Data\COMMON FILES\INTUIT
- C:\Program Data\COMMON FILES\INTUIT\QUICKBOOKS
- C:\Users\Public\Public Documents\Intuit\QuickBooks\FAMXX (XX = year)
- C:\Users\Public\Public Documents\Intuit\QuickBooks\Company Files
- C:\Users\Public\Public Documents\Intuit\QuickBooks\Sample Company Files\QuickBooks Enterprise Solutions X.0 (X = version) or C:\Users\Public\Public Documents\Intuit\QuickBooks\Sample Company Files\QuickBooks 20XX (XX = year)
- The user is supposed to carry out the steps for the folders listed. Considering that he/she might not have all the folders.
- The user is supposed to right click the folder and select the Properties tab.
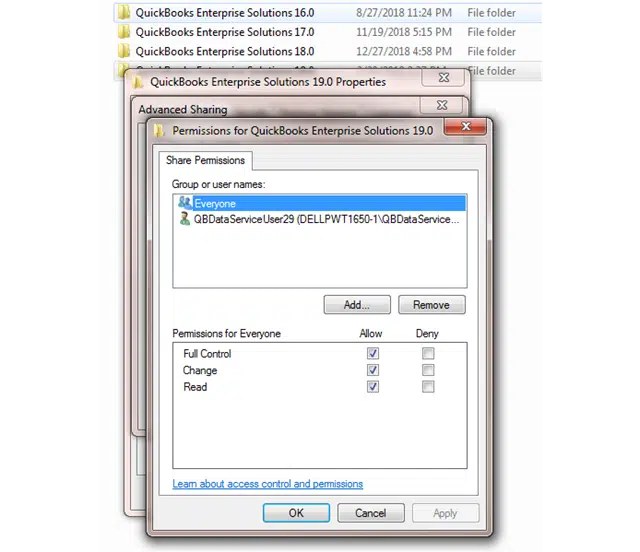
- Followed by selecting Everyone.
- It should be noted that, if everyone is not listed in the group or user name checkbox, then the user will have to select Add and type in everyone. Followed by hitting OK tab.
- The last step is to select full control and select Apply and OK tabs respectively.
Setting Windows Access Permissions to Share the Company Files
The user needs to ensure that QuickBooks has the right level of access that can assist in preventing future issues that might come across while working with the company files over the network.
For Windows 10 and 8
- The Windows 11, 10 and 8 users are required to open the Windows start menu and then open the File explorer.
- After that, spot and right click the folder having the company files.
- The next step is to select the Properties tab and then sharing and then share Add.
- Now, the user needs to select the corresponding QBDataServiceUserXX for the version being used.
- The last step is to Set the permissions of both users to Full control and hit on Share tab.
Windows 8.1
Taking the ownership of the file:
- To take the ownership, the user is supposed to open the Windows start menu and then open up the File explorer.
- Followed by, selecting the folder that is to be opted for ownership of, and click on Share.
- The next step is to select Advanced security and then Change. After that select advanced and then Find now tab.
- The last step is to select the User and hit OK tab.
Granting full control
- To grant full control, the user needs to open the Windows start menu and then open File explorer.
- Followed by selecting the folder and selecting Share.
- Now, choose Advanced security and then add and select a Principal.
- The next step is to select Advanced tab and then click on Find now.
- Once done with that, select the User and select OK tab.
- Also, select Full control and hit OK button.
Windows server 2012
The steps for Windows server 2012 are as follows. But before that, the user should ensure that the file and storage services are installed:
- At first, the user is supposed to open the Windows start menu. After that type Run into the search and also open the run command.
- Then, type in Server Manager and choose OK tab.
- Also, choose the File and storage services, and then Share.
- Now, on the task drop down, select New share.
- The next step is to select SMB share- Quick.
It should be noted that SMB share- Quick is the default profile. This selection might vary accordingly:
- Once done with that, the user needs to select type a custom path from the share location section and then browse to locate the folder you wish to share.
- The last step is to select the appropriate folder and choose select a folder and then hit Next tab.
It should be noted that you might leave the default selections under the configure share settings window and hit next again.
Read it Also: How to Fix QuickBooks Printer Not Activated Error Code 20?
Conclusion!
Towards the end of this article, it is expected that the information shared in above might help in setting up folder and windows access permissions to share QuickBooks company files. However, for any further technical assistance, call us at our toll-free number i.e., 1-800-761-1787, and our QuickBooks error support team will ensure to provide you with immediate technical assistance.
Related Articles:
How to Troubleshoot the WDDM Service Not Running in QuickBooks Error?